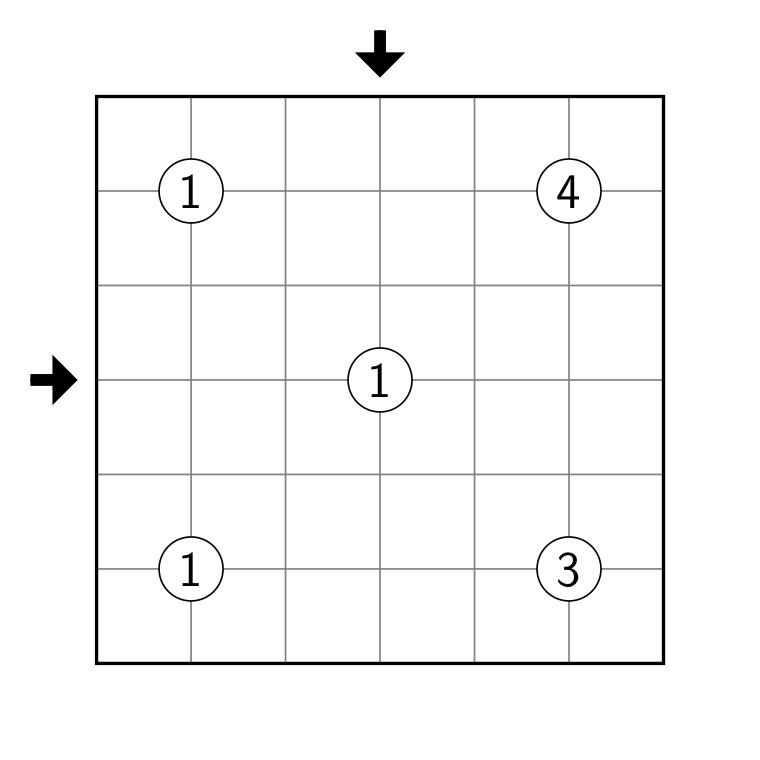
There seems to be a lack of information out there when it comes to rendering puzzles. The most obvious approach is probably to use a vector graphics program such as Inkscape, but people also use spreadsheet software or write Postscript directly. I’ve recently started using the Haskell Diagrams framework (more on that in a future post), but for today, I want to share how to render pretty puzzles using TikZ via LaTeX.
Simplifying things a bit, TikZ is a vector graphics package for the LaTeX document preparation system. If you want to follow along at home, install some TeX system, typically via your OS’ packaging system or from TeX Live. We’ll be writing a text file puzzle.tex; running pdflatex puzzle.tex will yield puzzle.pdf if nothing goes wrong. Or use TeXworks.
As an example, we’ll draw a small Slalomrundweg, see the Rätselportal for the rules. Here’s what it will look like:

We’ll start with some boilerplate; it’s a good idea to keep the code below in a file template.tex:
\documentclass{article}

\usepackage{tikz}
\usetikzlibrary{arrows}

\usepackage[tightpage,active]{preview}
\PreviewEnvironment{tikzpicture}

\begin{document}
\begin{tikzpicture}[scale=0.8]

% insert puzzle here

\end{tikzpicture}
\end{document}
This sets up a basic LaTex document that consists of a single TikZ picture. We tell LaTeX to load TikZ, including the arrows library, and to produce an output file that contains just the tikzpicture we’re going to fill in below. Cropping the document to that picture is what the mysterious preview stuff is for. One thing to note is the option scale to the tikzpicture environment: The default unit is 1cm, so this makes our grid cells have size 8mm.
Let’s put in a grid:
\draw[thin, black!50] (0,0) grid (6,6);
\draw[very thick] (0,0) rectangle (6,6);
Pretty easy, right? Paste this inside the tikzpicture environment and render it, and you should see an empty grid. The edges might not be very nice because of how preview crops the document to the picture; we could fix this by setting a PreviewBorder, but instead we’ll just enlarge the picture size. This will also make the image stay centered once we add the arrows.
\path (-1,-1) rectangle (7,7);\path is like \draw, except that it doesn’t use a pen. Next, we’ll add the clues. To just put the letter A at the point (2,3), we’d use \node at (2,3) {A};, but we need a little more than that for our circled clues.
\tikzstyle{clue} = [
    circle,
    draw,
    fill=white,
    inner sep=2pt,
    font=\sffamily\large
]

\foreach \x/\y/\c in {1/1/1, 1/5/1, 5/1/3, 5/5/4, 3/3/1}
    \node[clue] at (\x,\y) {\c};
First we define the style of our clue nodes. This isn’t strictly necessary, it just means that when we write \node[clue], the clue part is replaced by all the things in the earlier list. Those are:
circlethe outline of the node is a circle
drawwe want the outline to be drawn
fill=whitewe fill the background in white, to cover the grid lines
inner sep=2pta margin between the text and the circle (the node is sized to accomodate the text, which might not really be what we want here…)
font=\sffamily\largechoose the text font and size
Then, we use \foreach to place the clues at the given coordinates.
Finally, let’s add the arrows for the solution code. There’s some tricky stuff here that’s required to get them to look just right.
\tikzstyle{arr} = [
    -triangle 90,
    line width=0.4mm,
    postaction={draw, line width=0.1cm, shorten >=0.1cm, -}
]
\draw[arr] (-0.7,3) -- (-0.2,3);
\draw[arr] (3,6.7) -- (3,6.2);
That’s it! As a bonus, and at the risk of spoiling the puzzle, add the following. Best between drawing the grid and drawing the clues.
\draw[ultra thick, black!70]
    (3,5) -- (1,3) -- (3,1) -- (5,3)
    (1,1) -- (2,2)    (1,5) -- (2,4)
    (4,0) -- (6,2)    (5,1) -- (6,0)
    (3,3) -- (6,6)    (4,6) -- (6,4);
\draw[ultra thick, red!70]
    (1,0) -- (2,1) -- (3,0) -- (6,3)
          -- (5,4) -- (3,2) -- (2,3)
          -- (4,5) -- (3,6) -- (2,5)
          -- (1,6) -- (0,5) -- (1,4)
          -- (0,3) -- (1,2) -- (0,1) -- (1,0);